In this artilce, we will create a CRUD (Create, Read, Update, Delete) model in the Django Rest Framework and React. It will be for simple note taking. User will be able to add new note, read all her notes, update note (to upper or lower case), and delete selected note.
We will be using code from previous article: React Authenticated Component (code with tag v5).
Create CRUD model in DRF
Let’s start by adding a new app in the Django application.
# run in backend/server directory
django-admin startapp notes
mv notes apps
I’m moving all created applications to apps directory. It helps me to keep the project clean. After adding notes app, your directory structure should look like below:
.
├── apps
│   ├── accounts
│   │   ├── admin.py
│   │   ├── apps.py
│   │   ├── __init__.py
│   │   ├── migrations
│   │   │   └── __init__.py
│   │   ├── models.py
│   │   ├── tests.py
│   │   ├── urls.py
│   │   └── views.py
│   └── notes
│       ├── admin.py
│       ├── apps.py
│       ├── __init__.py
│       ├── migrations
│       │   └── __init__.py
│       ├── models.py
│       ├── tests.py
│       └── views.py
├── db.sqlite3
├── manage.py
└── server
    ├── asgi.py
    ├── __init__.py
    ├── settings.py
    ├── urls.py
    └── wsgi.py
Let’s define a database model in backend/server/apps/notes/models.py file. It will be very simple model with following information:
created_at- the automatically added timestamp at creation time.created_by- the foreign key to user that created the note. Please notice that it hason_delete=models.CASCADEwhich means that if user will be deleted, all her notes will be deleted as well.content- the text of the note.
Note: We are not adding id field, it will be added atumatically by Django as primary key with automatic increments.
# backend/server/apps/notes/models.py

from django.db import models
from django.contrib.auth import get_user_model

User = get_user_model()

class Note(models.Model):
    created_at = models.DateTimeField(auto_now_add=True)
    created_by = models.ForeignKey(User, on_delete=models.CASCADE)
    content = models.TextField(blank=True)
Please add a new file backend/server/apps/notes/serializers.py. The serializer will allow to create/update only content field. Other fields will be read-only.
# backend/server/apps/notes/serializers.py

from rest_framework import serializers
from apps.notes.models import Note

class NoteSerializer(serializers.ModelSerializer):

    class Meta:
        model = Note
        read_only_fields = (
            "id",
            "created_at",
            "created_by",
        )
        fields = (
            "id",
            "created_at",
            "created_by",
            "content"
        )
Model and serializer are ready. Time to add a view. We will use the DRF ModelViewSet because it provides all functions needed for CRUD.
# backend/server/apps/notes/views.py

from rest_framework import viewsets
from apps.notes.models import Note
from apps.notes.serializers import NoteSerializer

class NoteViewSet(viewsets.ModelViewSet):

    serializer_class = NoteSerializer
    queryset = Note.objects.all()

    def perform_create(self, serializer):
        serializer.save(created_by=self.request.user)

    def get_queryset(self):
        return self.queryset.filter(created_by=self.request.user)
We overwrite perform_create() (to save information about who created the note, created_by field) and get_queryset() (to return only notes created by owner) functions.
Please add a new file: backend/server/apps/notes/urls.py. We will define new URLs to the ModelViewSet in the urls.py file. We will use the DRF DefaultRouter. It provides all needed paths.
# backend/server/apps/notes/urls.py

from django.conf.urls import url, include
from rest_framework.routers import DefaultRouter
from apps.notes.views import NoteViewSet

router = DefaultRouter()
router.register("notes", NoteViewSet, basename="notes")
notes_urlpatterns = [url("api/v1/", include(router.urls))]
Our REST API for notes:
GETlist of notes:/api/v1/notes,GETone note with id:/api/v1/notes/1/(forid = 1),- create note, the
POSTrequest at/api/v1/notes/with note JSON containgcontentfield, - delete note with
DELETErequest at/api/v1/notes/1/(forid = 1), - partial note update with
PATCHrequest at/api/v1/notes/1/(forid = 1), - full note update with
PUTrequest at/api/v1/notes/1/(forid = 1).
To be able to access notes app in the Django server we need to update INSTALLED_APPS variable.
INSTALLED_APPS = [
    'django.contrib.admin',
    'django.contrib.auth',
    'django.contrib.contenttypes',
    'django.contrib.sessions',
    'django.contrib.messages',
    'django.contrib.staticfiles',
    #
    'rest_framework',
    'rest_framework.authtoken',
    'djoser',
    'corsheaders',
    #
    'apps.accounts', # remember about comma!!!
    'apps.notes'     # add notes
]
We need to update main URLs configuration in the backend/server/server/urls.py:
# backend/server/server/urls.py
from django.contrib import admin
from django.urls import path

from apps.accounts.urls import accounts_urlpatterns
from apps.notes.urls import notes_urlpatterns

urlpatterns = [
    path('admin/', admin.site.urls),
]

urlpatterns += accounts_urlpatterns # add URLs for authentication
urlpatterns += notes_urlpatterns    # notes URLs
We’ve added a new model in the database. Because of this, we need to create migration and then apply it.
# run in backend/server directory
./manage.py makemigrations
# the expected output
Migrations for 'notes':
  apps/notes/migrations/0001_initial.py
    - Create model Note
Apply migrations to the database:
# run in backend/server
./manage.py migrate
# the expected output
Operations to perform:
  Apply all migrations: admin, auth, authtoken, contenttypes, notes, sessions
Running migrations:
  Applying notes.0001_initial... OK
You can check how migration file looks like by checking backend/server/apps/notes/migrations/0001_initial.py file. It should look like below. Please do not edit this file. It is automatically generated by Django.
# backend/server/apps/notes/migrations/0001_initial.py

# Generated by Django 3.1.3 on 2020-11-09 10:42

from django.conf import settings
from django.db import migrations, models
import django.db.models.deletion


class Migration(migrations.Migration):

    initial = True

    dependencies = [
        migrations.swappable_dependency(settings.AUTH_USER_MODEL),
    ]

    operations = [
        migrations.CreateModel(
            name='Note',
            fields=[
                ('id', models.AutoField(auto_created=True,
                primary_key=True, serialize=False, verbose_name='ID')),
                ('created_at', models.DateTimeField(auto_now_add=True)),
                ('content', models.TextField(blank=True)),
                ('created_by', models.ForeignKey(
                    on_delete=django.db.models.deletion.CASCADE,
                    to=settings.AUTH_USER_MODEL)),
            ],
        ),
    ]
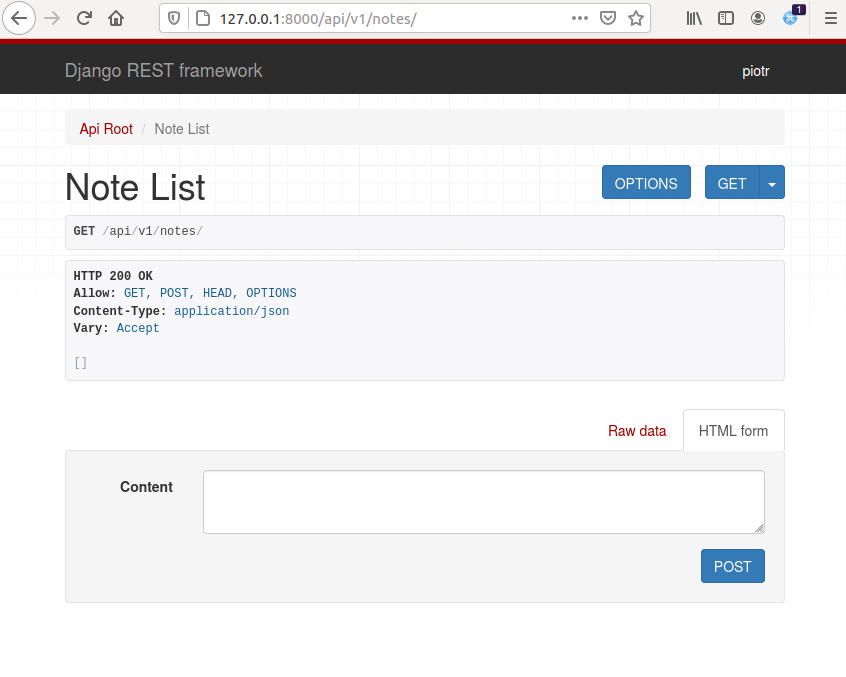
You can test the notes REST API by opening http://127.0.0.1/api/v1/notes/ in the web browser. Please remember to set the token in the ModHeader. You should see returned list of notes, which will be empty []:
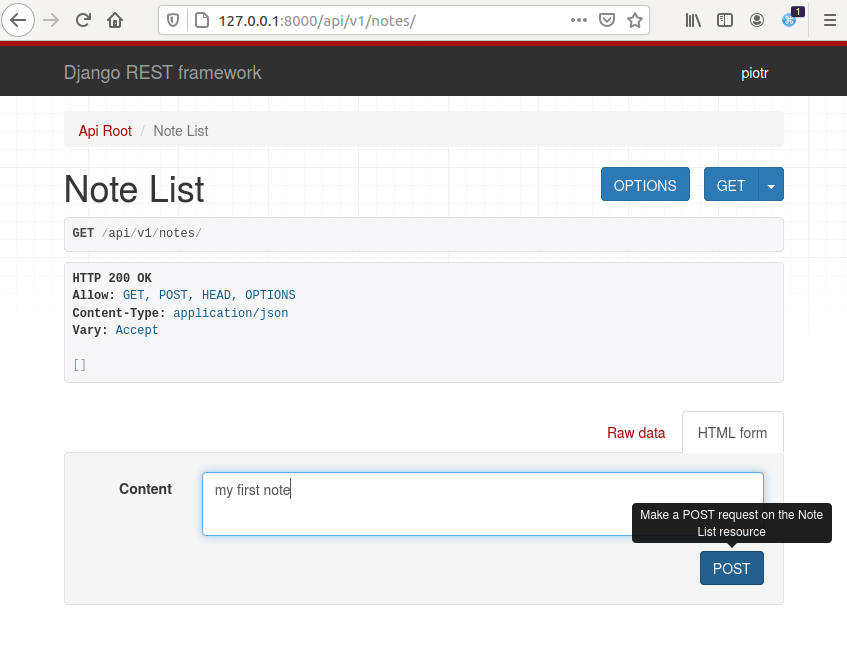
Let’s create the first note. Fill the Content form and click POST:
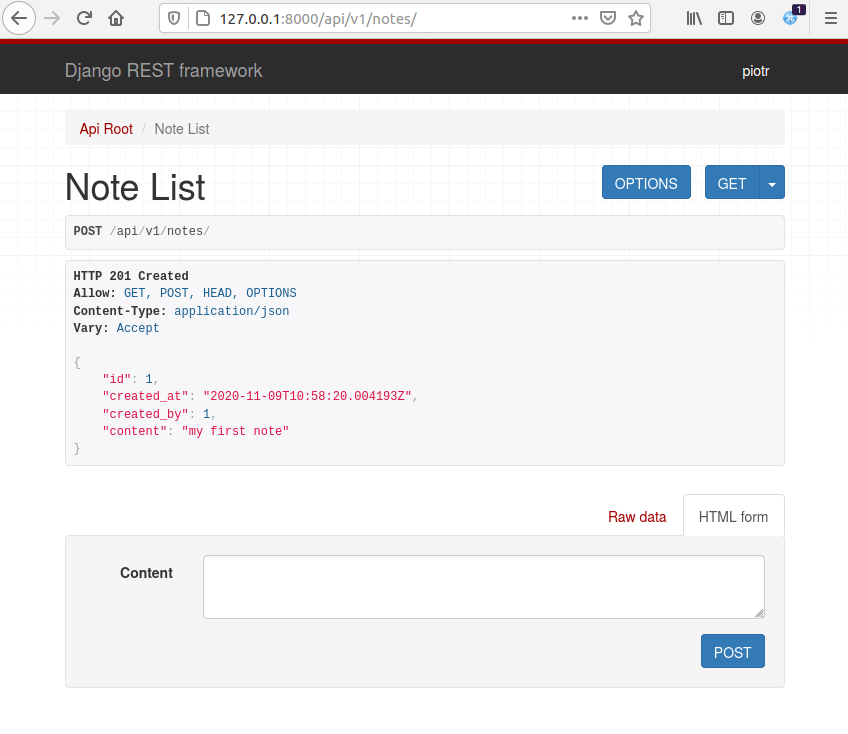
Now, the http://127.0.0.1/api/v1/notes/ address should return one note in the list:
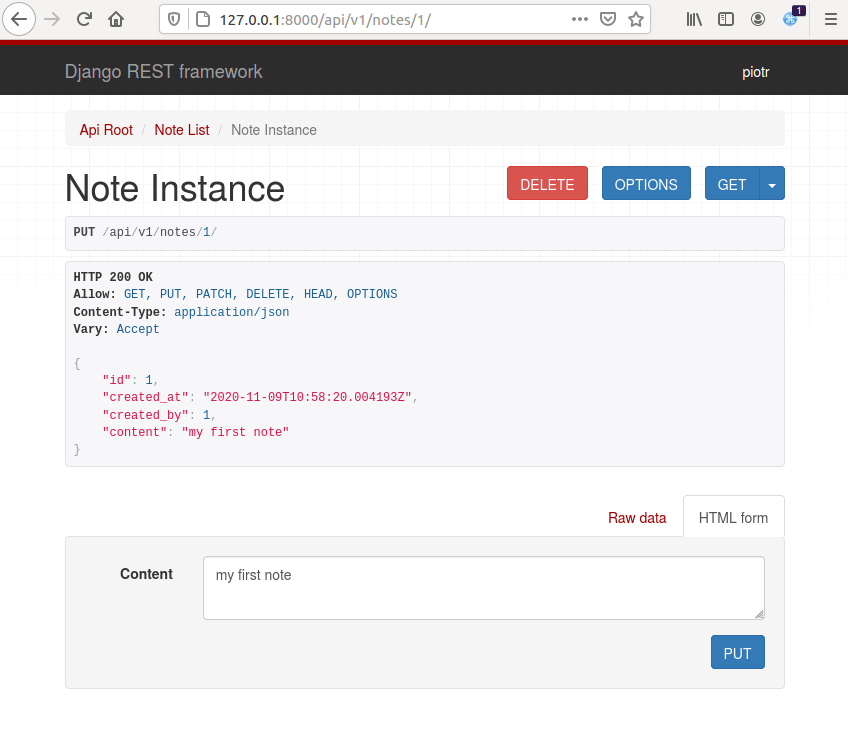
Please navigate to the first note by manually setting id to 1 in the URL address: http://127.0.0.1/api/v1/notes/1/. You should see DELETE and PUT buttons, which can be used to delete or update the note respectively.
That’s all! The backend REST API is ready. That’s why the Django Rest Framework is amazing.
The CRUD in React
We will add a new notes directory in the frontend/src/components/. We need to add several files in it:
NotesTypes.js- that will define action types,NotesActions.js- with functions implementations,NotesReducer.js- reducer for notes,Note.js- the component that will display one note,AddNote.js- the form to add a new note,NotesList.js- the component with list of notes.
I will first add Create and Read functionality, and then Update and Delete. I hope this way it will be easier to follow.
Create and Read objects in React
Let’s add the frontend/src/components/notes/NotesTypes.js file with two action types:
GET_NOTESADD_NOTE.
// frontend/src/components/notes/NotesTypes.js
export const GET_NOTES = "GET_NOTES";
export const ADD_NOTE = "ADD_NOTE";
There will be two functions in the frontend/src/components/notes/NotesActions.js file:
getNotes()- that will return all notes from the backend (withGETrequest),addNote()- that will submitPOSTrequest to add a new note in the backend.
// frontend/src/components/notes/NotesActions.js
import axios from "axios";
import { toastOnError } from "../../utils/Utils";
import { GET_NOTES, ADD_NOTE } from "./NotesTypes";

export const getNotes = () => dispatch => {
  axios
    .get("/api/v1/notes/")
    .then(response => {
      dispatch({
        type: GET_NOTES,
        payload: response.data
      });
    })
    .catch(error => {
      toastOnError(error);
    });
};

export const addNote = note => dispatch => {
  axios
    .post("/api/v1/notes/", note)
    .then(response => {
      dispatch({
        type: ADD_NOTE,
        payload: response.data
      });
    })
    .catch(error => {
      toastOnError(error);
    });
};
When function is successful it dispatches action. The notesReducer will change the data store according to the action type. The reducer is defined in the frontend/src/components/notes/NotesReducer.js file:
// frontend/src/components/notes/NotesReducer.js
import { GET_NOTES, ADD_NOTE } from "./NotesTypes";

const initialState = {
  notes: []
};

export const notesReducer = (state = initialState, action) => {
  switch (action.type) {
    case GET_NOTES:
      return {
        ...state,
        notes: action.payload
      };
    case ADD_NOTE:
      return {
        ...state,
        notes: [...state.notes, action.payload]
      };
    default:
      return state;
  }
};
We keep notes list in the store. If getNotes() returns the list with notes, they are simply assigned to the notes in the store. In the case of adding a new note, it is appended to the notes list.
Remeber to update the main reducer in frontend/Reducer.js. We need to add there notesReducer there:
// frontend/Reducer.js

import { combineReducers } from "redux";
import { connectRouter } from "connected-react-router";

import { signupReducer } from "./components/signup/SignupReducer";
import { loginReducer } from "./components/login/LoginReducer";
import { notesReducer } from "./components/notes/NotesReducer";

const createRootReducer = history =>
  combineReducers({
    router: connectRouter(history),
    createUser: signupReducer,
    auth: loginReducer,
    notes: notesReducer // added notesReducer
  });

export default createRootReducer;
To display list of notes, we first define the component for displaying one note. It will be Note component in the Note.js file. It just displays the content of the note as a text.
// frontend/src/components/notes/Note.js

import React, { Component } from "react";
import PropTypes from "prop-types";

class Note extends Component {
  render() {
    const { note } = this.props;
    return (
      <div>
        <p>{note.content}</p>
      </div>
    );
  }
}

Note.propTypes = {
  note: PropTypes.object.isRequired
};
export default Note;
Let’s define a form for adding a new note. It will be added in the AddNote.js file. It will have form with text input field and Add button. On click the onAddClick() function will be called, that calls addNote() function with text from the form as input argument.
// frontend/src/components/notes/AddNote.js
import React, { Component } from "react";
import PropTypes from "prop-types";
import { connect } from "react-redux";
import { withRouter } from "react-router-dom";
import { Button, Form } from "react-bootstrap";
import { addNote } from "./NotesActions";

class AddNote extends Component {
  constructor(props) {
    super(props);
    this.state = {
      content: ""
    };
  }
  onChange = e => {
    this.setState({ [e.target.name]: e.target.value });
  };

  onAddClick = () => {
    const note = {
      content: this.state.content
    };
    this.props.addNote(note);
  };

  render() {
    return (
      <div>
        <h2>Add new note</h2>
        <Form>
          <Form.Group controlId="contentId">
            <Form.Label>Note</Form.Label>
            <Form.Control
              as="textarea"
              rows={3}
              name="content"
              placeholder="Enter note"
              value={this.content}
              onChange={this.onChange}
            />
          </Form.Group>
        </Form>
        <Button variant="success" onClick={this.onAddClick}>
          Add note
        </Button>
      </div>
    );
  }
}

AddNote.propTypes = {
  addNote: PropTypes.func.isRequired
};

const mapStateToProps = state => ({});

export default connect(mapStateToProps, { addNote })(withRouter(AddNote));
Our list of notes will be defined in the NotesList.js file. It will call getNotes() function in the componentDidMount(), which means that notes will be requested from the backend after component is mounted. It displays notes from the store in the render() function. It is using Note component.
// frontend/src/components/notes/NotesList.js

import React, { Component } from "react";
import PropTypes from "prop-types";
import { connect } from "react-redux";
import { withRouter } from "react-router-dom";
import { getNotes } from "./NotesActions";

import Note from "./Note";

class NotesList extends Component {
  componentDidMount() {
    this.props.getNotes();
  }

  render() {
    const { notes } = this.props.notes;

    if (notes.length === 0) {
      return <h2>Please add your first note</h2>;
    }

    let items = notes.map(note => {
      return <Note key={note.id} note={note} />;
    });

    return (
      <div>
        <h2>Notes</h2>
        {items}
      </div>
    );
  }
}

NotesList.propTypes = {
  getNotes: PropTypes.func.isRequired,
  notes: PropTypes.object.isRequired
};

const mapStateToProps = state => ({
  notes: state.notes
});

export default connect(mapStateToProps, {
  getNotes
})(withRouter(NotesList));
To see all new components in the frontend we need to update the Dashboard.js:
// frontend/src/components/dashboard/Dashboard.js

import React, { Component } from "react";
import PropTypes from "prop-types";
import { connect } from "react-redux";
import { withRouter } from "react-router-dom";

import { Container, Navbar, Nav } from "react-bootstrap";
import { logout } from "../login/LoginActions";

import NotesList from "../notes/NotesList"; // add imports
import AddNote from "../notes/AddNote";     // add imports

class Dashboard extends Component {
  onLogout = () => {
    this.props.logout();
  };

  render() {
    const { user } = this.props.auth;
    return (
      <div>
        <Navbar bg="light">
          <Navbar.Brand href="/">Home</Navbar.Brand>
          <Navbar.Toggle />
          <Navbar.Collapse className="justify-content-end">
            <Navbar.Text>
              User: <b>{user.username}</b>
            </Navbar.Text>
            <Nav.Link onClick={this.onLogout}>Logout</Nav.Link>
          </Navbar.Collapse>
        </Navbar>
        <Container> {/* update here */}
          <NotesList />
          <AddNote />
        </Container>
      </div>
    );
  }
}

Dashboard.propTypes = {
  logout: PropTypes.func.isRequired,
  auth: PropTypes.object.isRequired
};

const mapStateToProps = state => ({
  auth: state.auth
});

export default connect(mapStateToProps, {
  logout
})(withRouter(Dashboard));
We updated this part of render() function:
<Container>
    <NotesList />
    <AddNote />
</Container>
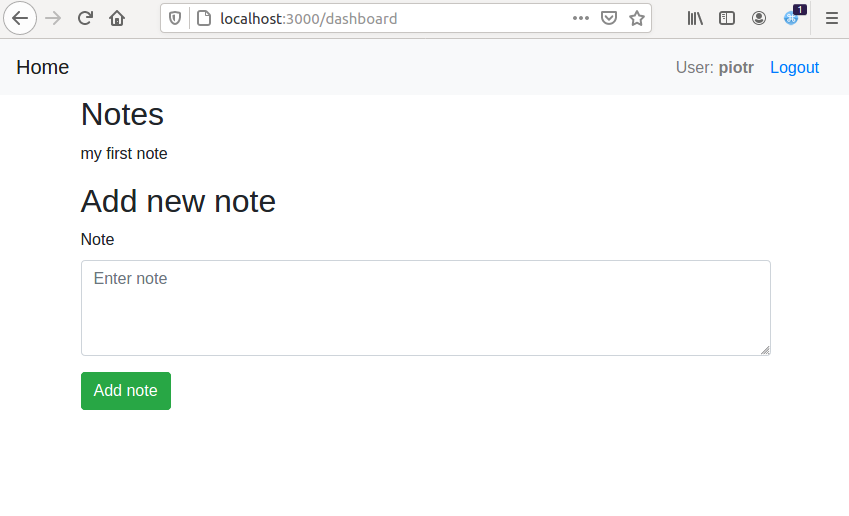
We added NotesList and AddNote components in the dashboard. If you open the application in the web browser at address: http://localhost:3000/dashboard you should see image like below. Please insert few notes by filling the form and clicking Add note button.
OK, we are now able to create and read notes. You can try to create few notes for other user, and check that only notes created by owner are displayed. Let’s add delete and update functionality in the frontend.
Delete and Update the model in React
We need to add DELETE_NOTE and UPDATE_NOTE types in the NotesTypes.js:
// frontend/src/components/notes/NotesTypes.js

export const GET_NOTES = "GET_NOTES";
export const ADD_NOTE = "ADD_NOTE";
export const DELETE_NOTE = "DELETE_NOTE"; // add new types
export const UPDATE_NOTE = "UPDATE_NOTE"; // add new types
We need to add import of new types in NotesActions.js. We will add two new functions deleteNote(id) and updateNode(id, note). The delete function is using DELETE request. The update function is using PATCH request. It will be a partial update (update only content field). For full update (update of all fileds) the PUT request should be used.
// frontend/src/components/notes/NotesActions.js
import { GET_NOTES, ADD_NOTE, DELETE_NOTE, UPDATE_NOTE } from "./NotesTypes";

// ...

// new functions
export const deleteNote = id => dispatch => {
  axios
    .delete(`/api/v1/notes/${id}/`)
    .then(response => {
      dispatch({
        type: DELETE_NOTE,
        payload: id
      });
    })
    .catch(error => {
      toastOnError(error);
    });
};

export const updateNote = (id, note) => dispatch => {
  axios
    .patch(`/api/v1/notes/${id}/`, note)
    .then(response => {
      dispatch({
        type: UPDATE_NOTE,
        payload: response.data
      });
    })
    .catch(error => {
      toastOnError(error);
    });
};
After a successful axios request, the actions are dispatched. They are handled in the notesReducer:
- The
DELETE_NOTEaction deletes notes with id number pointed in action payload. - The
UPDATE_NOTEupdates the notes list with updates note (updated note is returned in the response of the REST API).
// frontend/src/components/notes/NotesReducer.js

import { GET_NOTES, ADD_NOTE, UPDATE_NOTE, DELETE_NOTE } from "./NotesTypes";

const initialState = {
  notes: []
};

export const notesReducer = (state = initialState, action) => {
  switch (action.type) {
    case GET_NOTES:
      return {
        ...state,
        notes: action.payload
      };
    case ADD_NOTE:
      return {
        ...state,
        notes: [...state.notes, action.payload]
      };
    case DELETE_NOTE:
      return {
        ...state,
        notes: state.notes.filter((item, index) => item.id !== action.payload)
      };
    case UPDATE_NOTE:
      const updatedNotes = state.notes.map(item => {
        if (item.id === action.payload.id) {
          return { ...item, ...action.payload };
        }
        return item;
      });
      return {
        ...state,
        notes: updatedNotes
      };
    default:
      return state;
  }
};
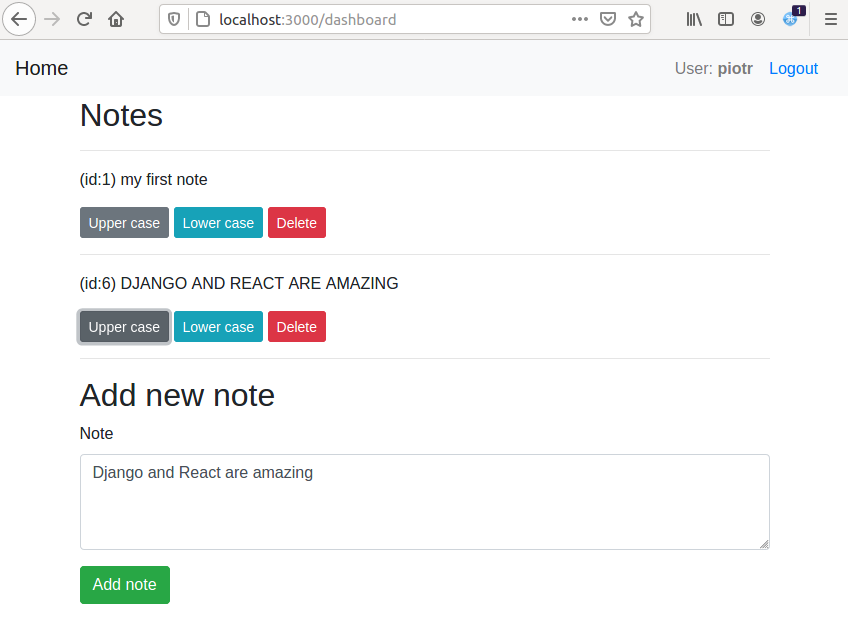
Let’s update the Note.js. We will add three buttons there:
Upper casebutton that changes the content to upper case,Lower casebutton that changes the content to lower case,Deletebutton that removes the note.
// frontend/src/components/notes/Note.js

import React, { Component } from "react";
import PropTypes from "prop-types";
import { connect } from "react-redux";
import { withRouter } from "react-router-dom";
import { deleteNote, updateNote } from "./NotesActions";
import { Button } from "react-bootstrap";

class Note extends Component {
  onDeleteClick = () => {
    const { note } = this.props;
    this.props.deleteNote(note.id);
  };
  onUpperCaseClick = () => {
    const { note } = this.props;
    this.props.updateNote(note.id, {
      content: note.content.toUpperCase()
    });
  };
  onLowerCaseClick = () => {
    const { note } = this.props;
    this.props.updateNote(note.id, {
      content: note.content.toLowerCase()
    });
  };
  render() {
    const { note } = this.props;
    return (
      <div>
        <hr />
        <p>
          (id:{note.id}) {note.content}
        </p>
        <Button variant="secondary" size="sm" onClick={this.onUpperCaseClick}>
          Upper case
        </Button>{" "}
        <Button variant="info" size="sm" onClick={this.onLowerCaseClick}>
          Lower case
        </Button>{" "}
        <Button variant="danger" size="sm" onClick={this.onDeleteClick}>
          Delete
        </Button>
      </div>
    );
  }
}

Note.propTypes = {
  note: PropTypes.object.isRequired
};
const mapStateToProps = state => ({});

export default connect(mapStateToProps, { deleteNote, updateNote })(
  withRouter(Note)
);
By changing the Note.js all notes displayed in NotesList.js will be updated. There will be a slight change in NotesList.js, please add horizonstal line <hr/>:
// frontend/src/components/notes/NotesList.js

// ...
       <div>
        <h2>Notes</h2>
        {items}
        <hr /> {/* add horizontal line */}
      </div>
// ...
OK, after all changes when you navigate to http://localhost:3000/dashboard you should see view like in the image below:
Add changes to repository code
Before going further please save all changes to the code repository:
git add backend/server/apps/notes/
git add frontend/src/components/notes/
git commit -am "add CRUD in django and react"
git push
Summary
- In this article we’ve added CRUD model in the backend and in the frontend.
- By using this approach you can add your own models and create CRUD applications.
What’s next
The next article is: Docker-compose for Django and React with Nginx reverse proxy and Let’s encrypt. It will describe how to build docker-compose and deploy it on AWS EC2 instance.
Let's stay in touch!
Would you like to be notified about new posts? Please fill this form.
Boilerplate Tutorial Articles:
1. Starting SaaS with Django and React
2. React Routing and Components for Signup and
Login
3. Token Based Authentication with
Django Rest Framework and Djoser
4. React Token Based Authentication to Django REST
API Backend
5. React Authenticated Component
6. CRUD in Django Rest Framework and React
(↩ you are here!)
7. Docker-Compose for Django and React with
Nginx reverse-proxy and Let's encrypt certificate
8. Django Rest Framework Email Verification
9. Django Rest Framework Reset Password
More articles coming soon!
Link to the code repository: saasitive/django-react-boilerplate