In this post, we will write React code to interact with token-based authentication REST API from the Django backend. We will use code from the previous post: Token Based Authenitcation with Django Rest Framework and Djoser (code with tag v3)
This post will be splitted into following parts:
- Add Signup actions and reducer.
- Add Cross-Origin Resource Sharing (CORS) headers to Django server responses. It will be required because we will make requests from other port than server.
- Add Login actions and reducer.
In this tutorial we will use axios library for doing server requests from React to Django server.
Add Signup Actions and Reducer
Let’s add new files in frontend/src/components/signup directory:
SignupTypes.js- it will define types of actions in the sign up component,SignupActions.js- it will implements actions needed for sign up,SignupReducer.js- it will implements how actions change the sign up data store.
The content of SignupTypes.js:
// frontend/src/components/signup/SignupTypes.js
export const CREATE_USER_SUBMITTED = "CREATE_USER_SUBMITTED";
export const CREATE_USER_SUCCESS = "CREATE_USER_SUCCESS";
export const CREATE_USER_ERROR = "CREATE_USER_ERROR";
There are defined three types of actions:
CREATE_USER_SUBMITTED, which means that the request to create a new user was send and we are waiting for server response. After this action type is dispatched, we should disableSignupbutton till server responded.CREATE_USER_SUCCESS- the action is called afterHTTP 201 CREATEDresponse from server, which means that user was successfully created.CREATE_USER_ERROR- the action is called when there was an error during creation of the user and it was not created.
We have types of actions defined, so let’s create the Reducer. Please add the following content to SignupReducer.js:
// frontend/src/components/SignupReducer.js

// import needed actions
import {
  CREATE_USER_ERROR,
  CREATE_USER_SUBMITTED,
  CREATE_USER_SUCCESS
} from "./SignupTypes";

// define the initial state of the signup store
const initialState = {
  usernameError: "",
  passwordError: "",
  isSubimtted: false
};

// define how action will change the state of the store
export const signupReducer = (state = initialState, action) => {
  switch (action.type) {
    case CREATE_USER_SUBMITTED:
      return {
        usernameError: "",
        passwordError: "",
        isSubimtted: true
      };
    case CREATE_USER_ERROR:
      const errorState = {
        usernameError: "",
        passwordError: "",
        isSubimtted: false
      };
      if (action.errorData.hasOwnProperty("username")) {
        errorState.usernameError = action.errorData["username"];
      }
      if (action.errorData.hasOwnProperty("password")) {
        errorState.passwordError = action.errorData["password"];
      }
      return errorState;
    case CREATE_USER_SUCCESS:
      return {
        usernameError: "",
        passwordError: "",
        isSubimtted: false
      };
    default:
      return state;
  }
}
The above Reducer accepts as input the initialState:
const initialState = {
  usernameError: "",
  passwordError: "",
  isSubimtted: false
};
The initialState defines what attributes will be in our store. It also set the inital values which are set at the beginning of application run. We will have following variables in the Signup components:
usernameError- the string that will be diplayed if there is an error with username. The initial value is set to empty string.passwordError- the string with error message displayed if the password field is invalid.isSubmitted- informs the component that create action was submitted. IfisSubmitted = truetheSignupbutton should be disabled (we don’t accept next signup requests untill the response from server).
There is a big switch statement in the signupReducer with separate case for each action type. Each action type defines its own way how to change the selected state of the application. Please remember to add default case which will just return the current state. That’s all, we have a reducer!
We need to add a signup reducer to the root reducer in frontend/src/Reducer.js (the rootReducer is connected to our store in method createStore() in the frontend/src/Root.js file):
// frontend/src/Reducer.js
import { combineReducers } from "redux";
import { connectRouter } from "connected-react-router";

// import new reducer
import { signupReducer } from "./components/signup/SignupReducer";

const createRootReducer = history =>
  combineReducers({
    router: connectRouter(history),
    createUser: signupReducer // <--- add it here
  });

export default createRootReducer;
Before defining actions we need to install one more (maybe two) packages. We need a package for sending requests to the server. I’m using axios package.
One more package, that is optional. I like to add toast notifications. For this I’m using react-toastify. It is optional and you can add a different way to display notifications.
The package installation command:
# should run in frontend directory
npm install axios

# optional (but I'm using it)
npm install react-toastify
Enable react-toastify
To have react-toastify enabled we need to do two things:
- add its css in
frontend/src/index.js
// add in `frontend/src/index.js`
import "react-toastify/dist/ReactToastify.css";
- add
ToastContainerin theAppcomponent:
// in frontend/src/App.js

// add import
import { ToastContainer } from "react-toastify";

// below <Root> add
<ToastContainer hideProgressBar={true} newestOnTop={true} />
You can use other toast parameters. I’m using hideProgressBar=true and newsetOnTop=true because I like it that way.
Signup action
Let’s add action to send the request to the server to create a new user:
// frontend/src/components/signup/SignupActions.js

import axios from "axios";
import { toast } from "react-toastify";
import { isEmpty } from "../../utils/Utils";
import {
  CREATE_USER_ERROR,
  CREATE_USER_SUBMITTED,
  CREATE_USER_SUCCESS
} from "./SignupTypes";

export const signupNewUser = userData => dispatch => {
  dispatch({ type: CREATE_USER_SUBMITTED }); // set submitted state
  axios
    .post("/api/v1/users/", userData)
    .then(response => {
      toast.success(
        "Account for " +
          userData.username +
          " created successfully. Please login."
      );
      dispatch({ type: CREATE_USER_SUCCESS });
    })
    .catch(error => {
      if (error.resposne) {
        // The request was made and the server responded with a status code
        // that falls out of the range of 2xx
        toast.error(JSON.stringify(error.response.data));
        dispatch({
          type: CREATE_USER_ERROR,
          errorData: error.response.data
        });
      } else if (error.message) {
        // the error message is available,
        // let's display it on error toast
        toast.error(JSON.stringify(error.message));
      } else {
        // strange error, just show it
        toast.error(JSON.stringify(error));
      }
    });
};
There is only one action signupNewUser in the SignupActions.js. It sends POST request to the server (at endpoint /api/v1/users/) with userData. It defines what to do with server response:
- If success, then green toast is displayed and
CREATE_USER_SUCCESSis dispatched. - In the case of the error, it dispatches
CREATE_USER_ERRORand show red toast.
Please take a look on how the error response was handled. We need to handle several types of errors. You can take a look at axios documentation about handling the errors.
Add Action and Reducer in the Signup Component
To have action and reducer data available in the Signup component we need to:
- add imports,
- update
onSignupClick()function to call thesignupNewUseraction, - add username and password error messages in the form,
- define reducer and action connection in the component.
// frontend/src/components/signup/Signup.js file

import React, { Component } from "react";
import { withRouter } from "react-router-dom"; // new import
import { connect } from "react-redux"; // new import
import PropTypes from "prop-types"; // new import
import { Link } from "react-router-dom";
import {
  Container,
  Button,
  Row,
  Col,
  Form,
  FormControl
} from "react-bootstrap";

import { signupNewUser } from "./SignupActions"; // new import

class Signup extends Component {
  constructor(props) {
    super(props);
    this.state = {
      username: "",
      password: ""
    };
  }
  onChange = e => {
    this.setState({ [e.target.name]: e.target.value });
  };

  // update function to call the action
  onSignupClick = () => {
    const userData = {
      username: this.state.username,
      password: this.state.password
    };
    this.props.signupNewUser(userData); // <-- signup new user request
  };

  render() {
    return (
      <Container>
        <Row>
          <Col md="4">
            <h1>Sign up</h1>
            <Form>
              <Form.Group controlId="usernameId">
                <Form.Label>User name</Form.Label>
                <Form.Control
                  isInvalid={this.props.createUser.usernameError}
                  type="text"
                  name="username"
                  placeholder="Enter user name"
                  value={this.state.username}
                  onChange={this.onChange}
                />
                <FormControl.Feedback type="invalid">
                  {this.props.createUser.usernameError}
                </FormControl.Feedback>
              </Form.Group>

              <Form.Group controlId="passwordId">
                <Form.Label>Your password</Form.Label>
                <Form.Control
                  isInvalid={this.props.createUser.passwordError}
                  type="password"
                  name="password"
                  placeholder="Enter password"
                  value={this.password}
                  onChange={this.onChange}
                />
                <Form.Control.Feedback type="invalid">
                  {this.props.createUser.passwordError}
                </Form.Control.Feedback>
              </Form.Group>
            </Form>
            <Button color="primary" onClick={this.onSignupClick}>
              Sign up
            </Button>
            <p className="mt-2">
              Already have account? <Link to="/login">Login</Link>
            </p>
          </Col>
        </Row>
      </Container>
    );
  }
}

// connect action and reducer
// replace
// export default Signup;
// with code below:

Signup.propTypes = {
  signupNewUser: PropTypes.func.isRequired,
  createUser: PropTypes.object.isRequired
};

const mapStateToProps = state => ({
  createUser: state.createUser
});

export default connect(mapStateToProps, {
  signupNewUser
})(withRouter(Signup));
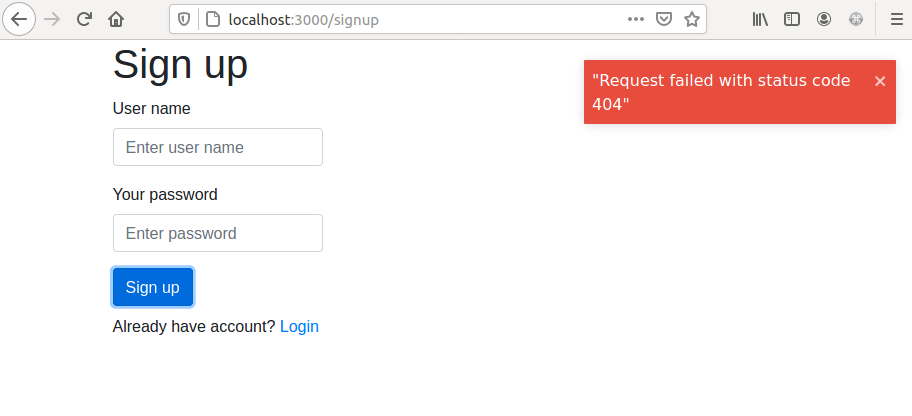
Ok, let’s go to https://localhost:3000/signup and just click Signup without filling username and password. You should get error toast with message: “Request failed with status code 404”
What’s going on? Where is the problem? Please open developer tools in your browser and click Signup when Network tab is open. Please take a look at the requests. There should be a signup request with 404 error, similar to the image below:
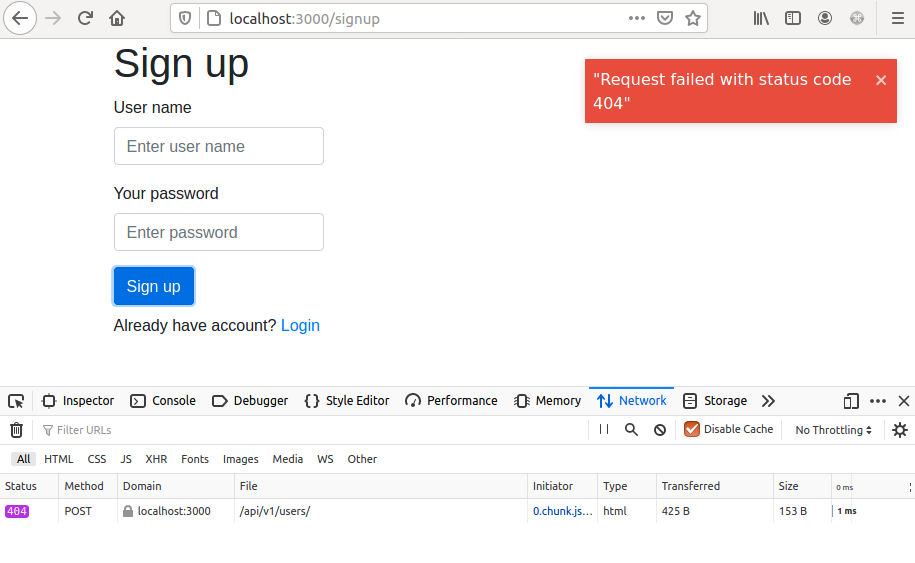
We were doing requests to the http://localhost:3000/api/v1/users endpoint. This is wrong, because our Django server is running on http://127.0.0.1:8000 (localhost and 127.0.0.1 are pointing to the same, but I keep the naming as they are in each framework). We need to change the baseURL in axios configuration. We will do this in frontend/src/App.js file:
// frontend/src/App.js
// after imports please add

import axios from "axios";
axios.defaults.baseURL = "http://127.0.0.1:8000";

// the rest of the file ...
OK, let’s try again to signup a new user (no need to fill the form, just click the Signup button). You should see the “Network Error” red toast. When you look into the console you should see more information:

There is an error message that request was blocked with a reason that CORS header Access-Control-Allow-Origin is missing. What is CORS? CORS - Cross-Origin Resource Sharing - it is a mechanism that restricts which resources can be accessed from another domain. As I wrote ealier the localhost and 127.0.0.1 are the same, BUT our django server is running on 8000 port and the frontend application is running on port 3000 - thus the difference. We need to allow the frontend application to access the django server resources. How to do this?
Add CORS in Django
We need to stop the Django server and install django-cors-headers. It will help us to manage CORS.
pip install django-cors-headers
Please remember to update backend/requirements.txt file:
# backend/requirements.txt
django_cors_headers==3.5.0 # add new package
To enable it in the server we need update backend/server/server/settings.py:
- we need to add it to
INSTALLED_APPSandMIDDLEWARElists, - what is more, we need to define the list of allowed origins
CORS_ALLOWED_ORIGINS.
# update backend/server/server/settings.py
# ...
INSTALLED_APPS = [
    #...
    'corsheaders', # add it here
    #...
]

# define which origins are allowed
CORS_ALLOWED_ORIGINS = [
    "http://localhost:3000",
    "http://127.0.0.1:3000"
]

# add to middleware
MIDDLEWARE = [
    #...
    'corsheaders.middleware.CorsMiddleware',
    'django.middleware.common.CommonMiddleware',
    #...
]
Please run the Django server again and check what will happend if you click Signup button.
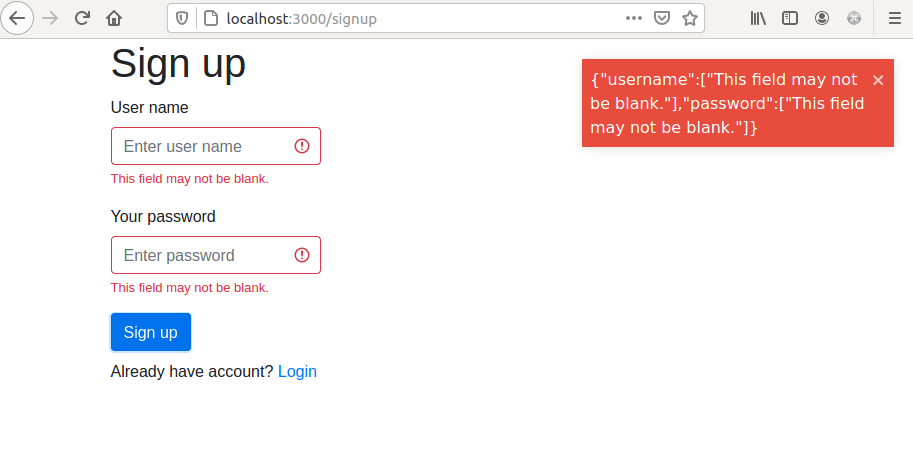
If you see the screen like in the image above, then everything works well! We got the response from the server that username and password fields can’t be blank (CORS is working!). Let’s fill the form with correct values and we will have the first user created! :)

Add Login Actions and Reducer
We need to add three files in the frontend/src/components/login:
LoginTypes.js- with action types definitions,LoginReducer.js- withswitch-caseimplementation how to change the state,LoginActions.js- with functions to dispatch actions.
The frontend/src/components/login/LoginTypes.js with login actions:
// frontend/src/components/login/LoginTypes.js
export const SET_TOKEN = "SET_TOKEN";
export const SET_CURRENT_USER = "SET_CURRENT_USER";
export const UNSET_CURRENT_USER = "UNSET_CURRENT_USER";
Let’s add a Reducer in frontend/src/components/login/LoginReducer.js file:
// frontend/src/components/login/LoginReducer.js file

import { SET_TOKEN, SET_CURRENT_USER, UNSET_CURRENT_USER } from "./LoginTypes";

const initialState = {
  isAuthenticated: false,
  user: {},
  token: ""
};

export const loginReducer = (state = initialState, action) => {
  switch (action.type) {
    case SET_TOKEN:
      return {
        ...state,
        isAuthenticated: true,
        token: action.payload
      };
    case SET_CURRENT_USER:
      return {
        ...state,
        user: action.payload
      };
    case UNSET_CURRENT_USER:
      return initialState;
    default:
      return state;
  }
};
Let’s add loginReducer in the root reducer:
// frontend/src/Reducer.js file

import { combineReducers } from "redux";
import { connectRouter } from "connected-react-router";

import { signupReducer } from "./components/signup/SignupReducer";
import { loginReducer } from "./components/login/LoginReducer"; // add import

const createRootReducer = history =>
  combineReducers({
    router: connectRouter(history),
    createUser: signupReducer,
    auth: loginReducer // <--- add reducer
  });

export default createRootReducer;
Let’s look closer at reducer and its state and actions. The initialState defined in login reducer:
const initialState = {
  isAuthenticated: false,
  user: {},
  token: ""
};
isAuthenticatedvariable will give us information if user is authenticated, it will be needed in displaying components that are available only for authorized users,user- it is an object that will store information about the current user,token- it is a value ofauth_token, it will be set after login.
There are defined three types of actions:
SET_TOKEN- it will be dispatched after successful login.SET_CURRENT_USER- it will set theuserobejct in the store. It will be called after successful request to/api/v1/users/me/endpoint.UNSET_CURRENT_USER- will reset the state by setting its initial value.
Now, it’s time to add our actions in LoginActions.js. There is a full code listing with all actions, I will go into details of each function below.
// frontend/src/components/login/LoginActions.js

import axios from "axios";
import { push } from "connected-react-router";
import { toast } from "react-toastify";
import { SET_TOKEN, SET_CURRENT_USER, UNSET_CURRENT_USER } from "./LoginTypes";
import { setAxiosAuthToken, toastOnError } from "../../utils/Utils";

export const login = (userData, redirectTo) => dispatch => {
  axios
    .post("/api/v1/token/login/", userData)
    .then(response => {
      const { auth_token } = response.data;
      setAxiosAuthToken(auth_token);
      dispatch(setToken(auth_token));
      dispatch(getCurrentUser(redirectTo));
    })
    .catch(error => {
      dispatch(unsetCurrentUser());
      toastOnError(error);
    });
};

export const getCurrentUser = redirectTo => dispatch => {
  axios
    .get("/api/v1/users/me/")
    .then(response => {
      const user = {
        username: response.data.username,
        email: response.data.email
      };
      dispatch(setCurrentUser(user, redirectTo));
    })
    .catch(error => {
      dispatch(unsetCurrentUser());
      toastOnError(error);
    });
};

export const setCurrentUser = (user, redirectTo) => dispatch => {
  localStorage.setItem("user", JSON.stringify(user));
  dispatch({
    type: SET_CURRENT_USER,
    payload: user
  });

  console.log("set user" + redirectTo);
  if (redirectTo !== "") {
    dispatch(push(redirectTo));
  }
};

export const setToken = token => dispatch => {
  setAxiosAuthToken(token);
  localStorage.setItem("token", token);
  dispatch({
    type: SET_TOKEN,
    payload: token
  });
};

export const unsetCurrentUser = () => dispatch => {
  setAxiosAuthToken("");
  localStorage.removeItem("token");
  localStorage.removeItem("user");
  dispatch({
    type: UNSET_CURRENT_USER
  });
};

export const logout = () => dispatch => {
  axios
    .post("/api/v1/token/logout/")
    .then(response => {
      dispatch(unsetCurrentUser());
      dispatch(push("/"));
      toast.success("Logout successful.");
    })
    .catch(error => {
      dispatch(unsetCurrentUser());
      toastOnError(error);
    });
};
We will need to add setAxiosAuthToken() and toastError() functions in the frontend/src/utils/Utils.js file:
// please add utils directory in frontend/src
// and the file frontend/src/utils/Utils.js

import axios from "axios";
import { toast } from "react-toastify";

export const setAxiosAuthToken = token => {
  if (typeof token !== "undefined" && token) {
    // Apply for every request
    axios.defaults.headers.common["Authorization"] = "Token " + token;
  } else {
    // Delete auth header
    delete axios.defaults.headers.common["Authorization"];
  }
};

export const toastOnError = error => {
  if (error.response) {
    // known error
    toast.error(JSON.stringify(error.response.data));
  } else if (error.message) {
    toast.error(JSON.stringify(error.message));
  } else {
    toast.error(JSON.stringify(error));
  }
};
Let’s look closer at actions defined in the LoginActions.js.
login(userData, redirectTo)
The login() function is a POST request to /api/v1/token/login endpoint. The userData is the JSON object with username and password. The login() function accepts as a second argument redirectTo variable that tells which URL should be displayed after login.
In the case of successful response:
- The
auth_tokenis send in thereponse.data. We set this token in request headers inaxiosconfiguration (it’s done by callingsetAxiosAuthToken()). - What is more, the
setToken()function is called. It saves the token in thelocalStorage. It will be needed if we want to refresh the website but don’t want to force the user to login again to be authenticated. - The last thing after successful reponse is to dispatch
getCurrentUser()function that will request user details. For now, as user details we have onlyusernameandemailbut later we will add there more information, for example if user is subscribed to paid plan.
In the case of login error:
- The
unsetCurrentUser()is dispatched. This function clears thelocalStoragedata andauthstate. - The error toast is displayed.
export const login = (userData, redirectTo) => dispatch => {
  axios
    .post("/api/v1/token/login/", userData) // post to login REST API
    .then(response => {
      const { auth_token } = response.data; // get auth_token
      setAxiosAuthToken(auth_token);        // set token in axios header
      dispatch(setToken(auth_token));       // set token in reducer
      dispatch(getCurrentUser(redirectTo)); // dispatch request to get user details
    })
    .catch(error => {
      dispatch(unsetCurrentUser()); // reset the state
      toastOnError(error);          // raise toast error
    });
};
getCurrentUser(redirectTo)
This function will GET user details from /api/v1/users/me/ endpoint.
In the case of success:
- It will dispatch
setCurrentUser()function with user data (usernameandemail) andredirectTovariable.
In the case of error reponse:
- The
unsetCurrentUser()is dispatched. This function clears thelocalStoragedata andauthstate. - The error toast is displayed.
export const getCurrentUser = redirectTo => dispatch => {
  axios
    .get("/api/v1/users/me/")
    .then(response => {
      const user = {
        username: response.data.username,
        email: response.data.email
      };
      dispatch(setCurrentUser(user, redirectTo));
    })
    .catch(error => {
      dispatch(unsetCurrentUser());
      toastOnError(error);
    });
};
setCurentUser(user, redirectTo)
This function set the user variable in the localStorage and in the auth store. If the variable redirectTo is not empty, then a routing to its URL is dispatched (it is using push from connected-react-router library).
export const setCurrentUser = (user, redirectTo) => dispatch => {
  localStorage.setItem("user", JSON.stringify(user));
  dispatch({
    type: SET_CURRENT_USER,
    payload: user
  });

  if (redirectTo !== "") {
    dispatch(push(redirectTo));
  }
};
setToken(token)
This function set token in request header (in the axios configuration). It also set token in the localStorage and auth store (SET_TOKEN action).
export const setToken = token => dispatch => {
  setAxiosAuthToken(token);
  localStorage.setItem("token", token);
  dispatch({
    type: SET_TOKEN,
    payload: token
  });
};
unsetCurrentUser()
It removes the token in the axios configuration. It also clears the localStorage data and the auth store.
export const unsetCurrentUser = () => dispatch => {
  setAxiosAuthToken("");
  localStorage.removeItem("token");
  localStorage.removeItem("user");
  dispatch({
    type: UNSET_CURRENT_USER
  });
};
logout()
The logout() function send POST request to /api/v1/token/logout/ endpoint.
In the case of success:
- It clears user data and token in the
loclStorageand theauthstore. - It redirects the view to
/URL (which in our case will displayHomecomponent). - It shows the success toast.
In the case of error response:
- It clears user data and token in the
localStorageand theauthstore. - It shows the error toast.
export const logout = () => dispatch => {
  axios
    .post("/api/v1/token/logout/")
    .then(response => {
      dispatch(unsetCurrentUser());
      dispatch(push("/"));
      toast.success("Logout successful.");
    })
    .catch(error => {
      dispatch(unsetCurrentUser());
      toastOnError(error);
    });
};
The logout() function won’t be used in Login component, but for consistency, I’ve added it with login related functions.
Connect action and store in the Login component
Let’s add login() action and the auth store in the component.
- We will need to update imports,
- We will need to call
login()inonLoginClick()function, - We will need to connect action and the
authstore to theLogincomponent.
// frontend/src/components/login/Login.js

import React, { Component } from "react";
import { withRouter } from "react-router-dom";  // new import
import { connect } from "react-redux";          // new import
import PropTypes from "prop-types";             // new import
import { Link } from "react-router-dom";
import { Container, Button, Row, Col, Form } from "react-bootstrap";

import { login } from "./LoginActions.js";      // new import

class Login extends Component {
  constructor(props) {
    super(props);
    this.state = {
      username: "",
      password: ""
    };
  }
  onChange = e => {
    this.setState({ [e.target.name]: e.target.value });
  };

  onLoginClick = () => {
    const userData = {
      username: this.state.username,
      password: this.state.password
    };
    this.props.login(userData, "/dashboard"); // <--- login request
  };
  render() {
    return (
      <Container>
        <Row>
          <Col md="4">
            <h1>Login</h1>
            <Form>
              <Form.Group controlId="usernameId">
                <Form.Label>User name</Form.Label>
                <Form.Control
                  type="text"
                  name="username"
                  placeholder="Enter user name"
                  value={this.state.username}
                  onChange={this.onChange}
                />
              </Form.Group>

              <Form.Group controlId="passwordId">
                <Form.Label>Your password</Form.Label>
                <Form.Control
                  type="password"
                  name="password"
                  placeholder="Enter password"
                  value={this.state.password}
                  onChange={this.onChange}
                />
              </Form.Group>
            </Form>
            <Button color="primary" onClick={this.onLoginClick}>
              Login
            </Button>
            <p className="mt-2">
              Don't have account? <Link to="/signup">Signup</Link>
            </p>
          </Col>
        </Row>
      </Container>
    );
  }
}

// connect action and store and component
Login.propTypes = {
  login: PropTypes.func.isRequired,
  auth: PropTypes.object.isRequired
};

const mapStateToProps = state => ({
  auth: state.auth
});

export default connect(mapStateToProps, {
  login
})(withRouter(Login));
Note: I removed <FormControl.Feedback type="invalid"> from the Login form. It is for simplicity.
OK, we are ready to login! But before, please check how the view will behave in the case of wrong credentials. You should see errors displayed with error (red) toast.
Let’s login with correct credentials. Please fill the form and click Login. If successful, you should be redirected to the Dashboard view. It is worth to check the localStorage after the successful login.
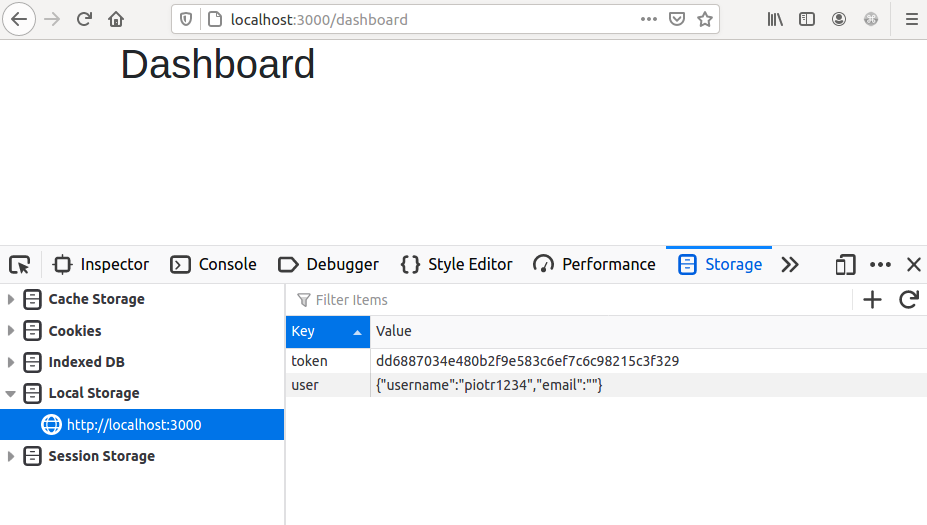
You should see token and user in the localStorage. Please try to refresh the website or open a website in the new tab, the values in localStorage will be sill there. Because of this, user doesn’t need to login again.
Load localStorage token and user
To load values from localStorage we need to update frontend/src/Root.js file:
import React from "react";
import thunk from "redux-thunk";
import { Provider } from "react-redux";
import { createBrowserHistory } from "history";
import { applyMiddleware, createStore } from "redux";
import { routerMiddleware, ConnectedRouter } from "connected-react-router";

import rootReducer from "./Reducer";
import { setCurrentUser, setToken } from "./components/login/LoginActions"; // new imports
import { isEmpty } from "./utils/Utils"; // new imports

export default ({ children, initialState = {} }) => {
  const history = createBrowserHistory();
  const middleware = [thunk, routerMiddleware(history)];

  const store = createStore(
    rootReducer(history),
    initialState,
    applyMiddleware(...middleware)
  );

  // check localStorage
  if (!isEmpty(localStorage.getItem("token"))) {
    store.dispatch(setToken(localStorage.getItem("token")));
  }
  if (!isEmpty(localStorage.getItem("user"))) {
    const user = JSON.parse(localStorage.getItem("user"));
    store.dispatch(setCurrentUser(user, ""));
  }

  return (
    <Provider store={store}>
      <ConnectedRouter history={history}>{children}</ConnectedRouter>
    </Provider>
  );
};
Please add isEmpty() function in frontend/src/utils/Utils.js:
// please add this function
// in frontend/src/utils/Utils.js file
// ...
export const isEmpty = value =>
  value === undefined ||
  value === null ||
  (typeof value === "object" && Object.keys(value).length === 0) ||
  (typeof value === "string" && value.trim().length === 0);
The logic behind this check is simple. If there is a token key in the localStorage, dispatch setToken() with token value from the storage. The same for user data. Because of this, after user refresh the website or open website in a new tab, the values from the localStorage will be loaded, added to the store, and the token will be set in the response header in the axios configuration.
Add changes to the repository
Please remember to commit all changes to the repository:
git add frontend/src/components/signup/*js
git add frontend/src/components/login/*js
git add frontend/src/utils
git commit -am "add auth in react"
git push
The code for this post is available at GitHub repository saasitive/django-react-boilerplate (with tag v4).
Summary
- We’ve added signup functions and reducer.
- We set up CORS in the backend.
- We added login functions and reducer.
- The authentication data (
tokenanduser) are saved in thelocalStorage. They can be loaded after website refresh or opening website in a new tab.
localStorage vs cookies httpOnly
There is a lot of discussion over the internet on how to store the auth_token in the website to be secure:
- Reddit post Local Storage vs Cookie [Authentication Tokens],
- GitHub discussion security: pulling tokens from localStorage is not secure
Here is my opinion:
- The most secure option is to not store any security data on the client-side. Just force a user to login every time she refreshes the website or opens a website in a new tab.
- In the case of XSS (Cross Site Scripting) attack the values from the
localStoragecan be read. That’s true. If we have token set in the cookies withhttpOnlysetting then in the case of XSS they can not be read. Also true. Does it mean that cookies withhttpOnlyare better thanlocalStorage? Can’t say that. Does it mean thathttpOnlycookies prevent XSS? Absolutely, no! - First of all, React has built-in mechanism against XSS attacks. It will render raw HTML only if you explicitly ask for it with
dangerouslySetInnerHTML. - If there will be XSS, then bad actor can read
tokenfromlocalStoragebut what can he do with it? He can send it to his server or use it for malicious requests. We can protect the application against loading unknow scripts from unknown sources with Content Security Policy (CSP) (for sure I will write about it in the future posts). - OK, so there is still option to do malicious requests. This can be done for both types of data storing:
localStorageandcookies. - What is more, if cookies with
httpOnlyare used, malicious requests can be done from other sources (the Cross-Site Request Forgery). Such an attack doesn’t apply in the case of thelocalStorage. - The easiest solution to protect against malicious requests is to logout (in our case). In this tutorial, at logout the token is destroyed, so it can’t be used anymore to authenticate requests.
- To summarize, in the case of XSS, there is no rescue (cookies wont help much). Cookies enable one more type of attack: CSRF.
- In my opinion, the approach that I show you is secure (as it can be).
What’s next?
We will create views that require authentication to be displayed. In this post, user can see the Dashboard view even if she is not logged in. We will write AuthenticatedComponent that will check if user is authenticated. If yes, then it will show the component, otherwise it will redirect user to login view.
Next article: React Authenticated Component
Let's stay in touch!
Would you like to be notified about new posts? Please fill this form.
Boilerplate Tutorial Articles:
1. Starting SaaS with Django and React
2. React Routing and Components for Signup and
Login
3. Token Based Authentication with
Django Rest Framework and Djoser
4. React Token Based Authentication to Django REST
API Backend
(↩ you are here!)
5. React Authenticated Component
6. CRUD in Django Rest Framework and React
7. Docker-Compose for Django and React with
Nginx reverse-proxy and Let's encrypt certificate
8. Django Rest Framework Email Verification
9. Django Rest Framework Reset Password
More articles coming soon!
Link to the code repository: saasitive/django-react-boilerplate