 Deploying Django application that is using Celery and Redis might be challenging. Thanks to
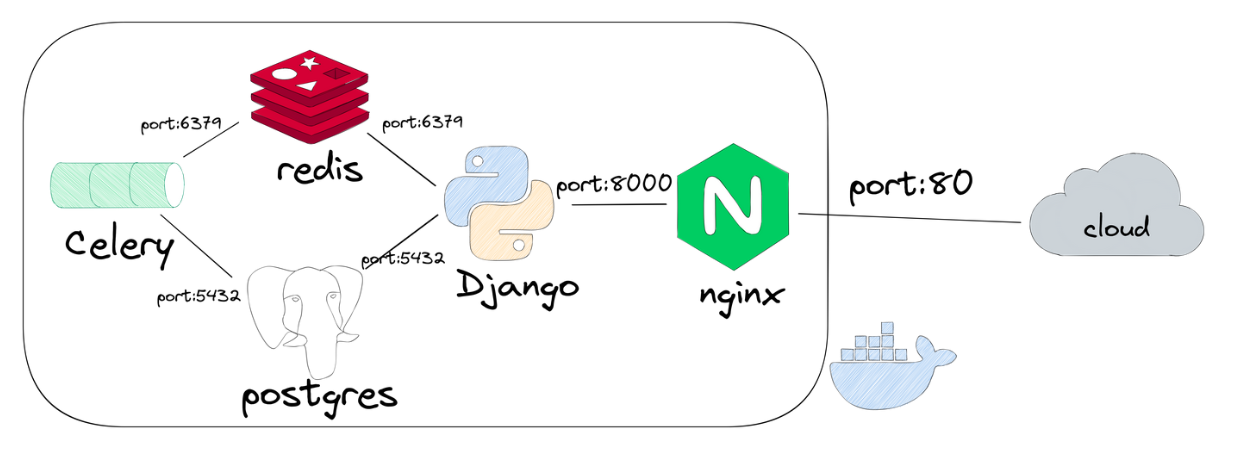
 docker-compose tool we can prepare docker containers locally and make deployment much easier. I would like to show you my approach for constructing docker-compose configuration that can be reused in other web applications. I will be using Django version 4.1.3 and Celery 5.2.7. The nginx server will be used as reverse proxy for Django and to serve static files. Postgres database and Redis will be in the docker-compose.
The docker-compose architecture created in this article is presented in the diagram below:
All code from this article is available in the GitHub repository. In case of any problems or questions, please add a GitHub issue there. Good luck!
Example project
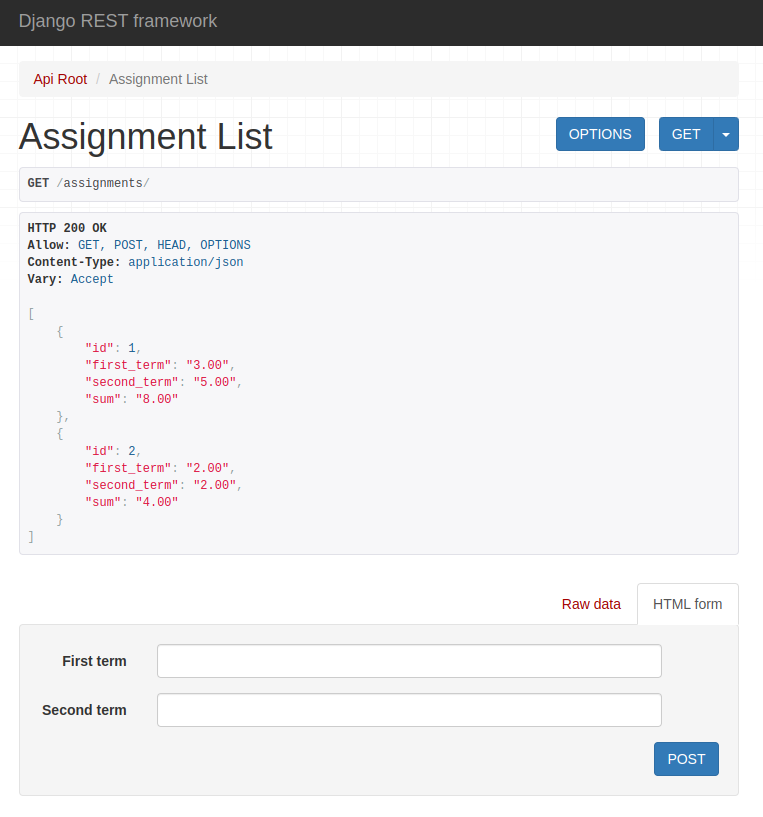
We will build a simple web application that will add two numbers in the background. We will use Django Rest Framework API viewer as our User Interface. There will be an Assignment model in the database. It will have following fields:
first_term,second_term,sum.
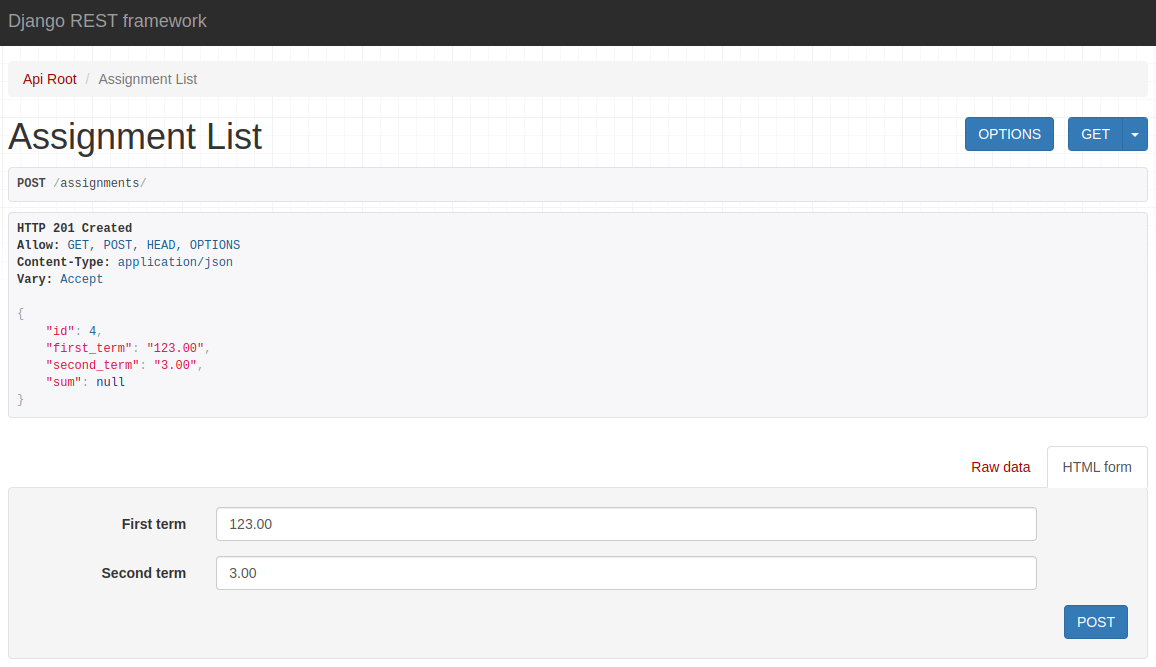
The first_term and second_term will be provided by REST API. The sum will be computed in the backgorund by Celery after object creation. Below is a screenshot from application view:
The whole project will be packed with docker-compose. It will contain following containers: ngnix, server, worker, redis, db.
Setup environment
Let’s start by configuring local environment. I’m using Python 3.8 and Ubuntu 20.04. Please create a new directory for the project or ideally a new git repository and start a new virtual environment there:
# create a new virtual environemnt
virtualenv venv

# activate virtual environment
source venv/bin/activate
Please create a requirements.txt file with following packages:
django

djangorestframework
markdown
django-filter

celery[redis]

psycopg2-binary
We install Celery with all required packages to work with Redis. The psycopg2-binary is needed to connect Django with Postgres database. Please install required packages:
pip install -r requirements.txt
Please make sure that you have Redis available locally (link to official Redis documentation on how to install it). You can check if you have Redis installed correctly by typing:
redis-cli
You should see connection open to Redis server. We will not use Postgres locally, we will stick to SQLite. However, you can use Postgres locally (docker-compose configuration will be the same).
Please make sure that you have docker and docker-compose installed.
Start Django project
We need to bootstrap a Django project with django-admin tool (it is provided with Django package):
django-admin startproject backend
The above command will initialize an empty Django project. You should see directory structure like below:
backend/
├── backend
│   ├── asgi.py
│   ├── __init__.py
│   ├── settings.py
│   ├── urls.py
│   └── wsgi.py
└── manage.py
I call all my Django projects as backend. I usually use Django with React, so I have frontend and backend directories. You can name it as you want, but for similicity you can stick now with backend :)
The next step is to change working directory to the backend. We will add a new Django app:
python manage.py startapp assignments
The new app name is assignments. You should see directory structure like below:
backend/
├── assignments
│   ├── admin.py
│   ├── apps.py
│   ├── __init__.py
│   ├── migrations
│   │   └── __init__.py
│   ├── models.py
│   ├── tests.py
│   └── views.py
├── backend
│   ├── asgi.py
│   ├── __init__.py
│   ├── settings.py
│   ├── urls.py
│   └── wsgi.py
└── manage.py
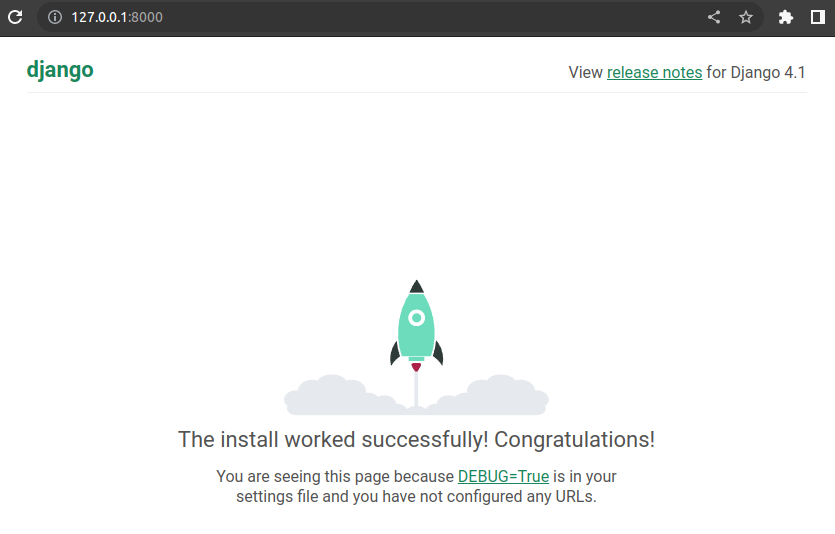
We can start a development server and see a launching rocket at 127.0.0.1:8000:
Assignment database model
Please update INSTALLED_APPS variable in the backend/backend/settings.py:
# rest of the code ...

INSTALLED_APPS = [
    "django.contrib.admin",
    "django.contrib.auth",
    "django.contrib.contenttypes",
    "django.contrib.sessions",
    "django.contrib.messages",
    "django.contrib.staticfiles",
    "rest_framework",             # DRF
    "assignments",                # new app
]

# rest of the code ...
Let’s create a database model for Assignment objects. Please edit backend/assignments/models.py file:
from django.db import models


class Assignment(models.Model):

    first_term = models.DecimalField(
        max_digits=5, decimal_places=2, null=False, blank=False
    )

    second_term = models.DecimalField(
        max_digits=5, decimal_places=2, null=False, blank=False
    )

    # sum should be equal to first_term + second_term
    # its value will be computed in Celery
    sum = models.DecimalField(max_digits=5, decimal_places=2, null=True, blank=True)
We need to create and apply migrations:
# create migrations
python manage.py makemigrations

# apply migrations
python manage.py migrate
We will be using DRF ModelViewSet for creating a CRUD REST API for our models. We will need to add serializers.py file in the backend/assignments directory:
from rest_framework import serializers

from assignments.models import Assignment


class AssignmentSerializer(serializers.ModelSerializer):
    class Meta:
        model = Assignment
        read_only_fields = ("id", "sum")
        fields = ("id", "first_term", "second_term", "sum")
The id and sum fields are read-only. The id is automatically set in the database. The sum value will be computed in the Celery.
The backend/assignments/views.py file content:
from django.db import transaction

from rest_framework import viewsets
from rest_framework.exceptions import APIException

from assignments.models import Assignment
from assignments.serializers import AssignmentSerializer
from assignments.tasks import task_execute


class AssignmentViewSet(viewsets.ModelViewSet):

    serializer_class = AssignmentSerializer
    queryset = Assignment.objects.all()

    def perform_create(self, serializer):
        try:
            with transaction.atomic():
                # save instance
                instance = serializer.save()
                instance.save()

                # create task params
                job_params = {"db_id": instance.id}

                # submit task for background execution
                transaction.on_commit(lambda: task_execute.delay(job_params))

        except Exception as e:
            raise APIException(str(e))
The ModelViewSet is doing the job here with basic CRUD implementation - not much to code for us :) We overwrite the perform_create function to submit a background task after object creation. Please notice that object creation and submitting a background tasks are inside transaction.
We need to implement the task_execute function. Please add tasks.py file in the backend/assignments directory:
from celery import shared_task

from assignments.models import Assignment


@shared_task()
def task_execute(job_params):

    assignment = Assignment.objects.get(pk=job_params["db_id"])

    assignment.sum = assignment.first_term + assignment.second_term

    assignment.save()
The task_execute is a shared task, it will be discovered by Celery. It accepts one argument job_params that has db_id, which is id of Assignment object. We simply get the object by id, compute sum and save the object.
One more thing to do, we need to wire assignments URL endpoints. Please add a new file urls.py in the backend/assignments:
from django.urls import re_path
from rest_framework.routers import DefaultRouter

from assignments.views import AssignmentViewSet

router = DefaultRouter()
router.register(r"assignments", AssignmentViewSet, basename="assignments")
assignments_urlpatterns = router.urls
We are using DRF DefaultRouter to generate CRUD API endpoints. We need to add assignments_urlpatterns in the main urls.py. Please edit the file backend/backend/urls.py:
from django.contrib import admin
from django.urls import path
from assignments.urls import assignments_urlpatterns

urlpatterns = [
    path("admin/", admin.site.urls),
]

# add new urls
urlpatterns += assignments_urlpatterns
Configure Celery
We need to setup Celery to work with Django. Please add a new file celery.py in the backend/backend directory:
import os

from celery import Celery
from django.conf import settings

os.environ.setdefault("DJANGO_SETTINGS_MODULE", "backend.settings")

app = Celery("backend")

app.config_from_object("django.conf:settings", namespace="CELERY")

app.autodiscover_tasks()
The next thing is to update backend/backend/__init__.py file:
from .celery import app as celery_app

__all__ = ("celery_app",)
We need to add configuration variables at the end of backend/backend/settings.py:
# rest of the code ...

# celery broker and result
CELERY_BROKER_URL = "redis://localhost:6379/0"
CELERY_RESULT_BACKEND = "redis://localhost:6379/0"
Running locally
We need two terminals open to run the project locally. Please run the Django development server in the first terminal:
python manage.py runserver
In the second terminal, please start a Celery worker:
# please run in the backend directory (the same dir as runserver command)

celery -A backend worker --loglevel=info --concurrency 1 -E
Please open A web browser at 127.0.0.1:8000/assignments and create a new Assignment object by clicking POST button. After object creation the sum should be null, like in the image below:
Please click GET in the right upper corner, to get list of all assignments. You should see the sum value computed:
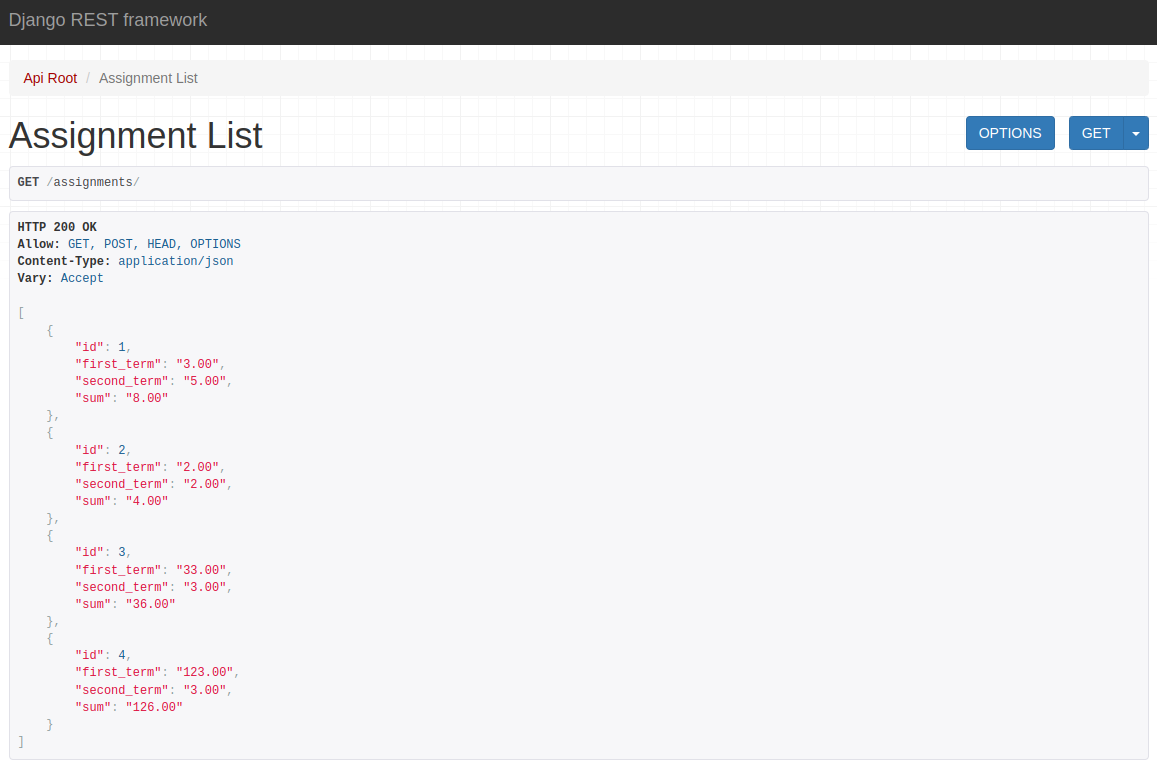
It was computed in the background with Celery framework. We are using here super simple example, that is fast. In real world, the background task can take even hours to complete - depends on the project.
Create Dockerfile
It’s time to create a Dockerfile for server and worker. Server and worker will run in separate containers, but they will have the same Dockerfile. Please add new directories:
dockerdocker/backend.
Please add a new file Dockerfile in docker/backend:
1
2
3
4
5
6
7
8
9
10
11
12
13
14
15
16
FROM python:3.8.15-alpine

RUN apk update && apk add python3-dev gcc libc-dev

WORKDIR /app

RUN pip install --upgrade pip
RUN pip install gunicorn
ADD ./requirements.txt /app/
RUN pip install -r requirements.txt

ADD ./backend /app/backend
ADD ./docker /app/docker

RUN chmod +x /app/docker/backend/server-entrypoint.sh
RUN chmod +x /app/docker/backend/worker-entrypoint.sh
- line 1: we are using
python:3.8.15-alpineimage as base. - line 3: we install
gccand python development libraries to install and build new packages. - line 5: we add
appdirectory and set it as working directory. - line 6: copy
requirements.txtfile to image. - lines 8-10: update
pip, installgunicornand required packages. - lines 12-13: copy
backendanddockerdirectories to the docker image. - lines 15-16: add execution rights to entrypoint scripts.
Entrypoint scripts
I prefer to keep execution commands in separate scripts (they can be defined in docker-compose). Let’s add script that will start gunicorn server. Please add server-entrypoint.sh file in the docker/backend directory:
1
2
3
4
5
6
7
8
9
10
11
12
13
14
15
16
17
18
19
20
21
22
23
#!/bin/sh

until cd /app/backend
do
    echo "Waiting for server volume..."
done


until python manage.py migrate
do
    echo "Waiting for db to be ready..."
    sleep 2
done


python manage.py collectstatic --noinput

# python manage.py createsuperuser --noinput

gunicorn backend.wsgi --bind 0.0.0.0:8000 --workers 4 --threads 4

# for debug
#python manage.py runserver 0.0.0.0:8000
Explanations for server-entrypoint.sh script:
- lines 3-6: we wait till
/app/backenddirectory is ready. - lines 9-13: we wait till database is ready and run migration.
- line 16: collect static files.
- line 20: start gunicorn server.
- line 23: I left the command to start development server. It is sometimes needed for debugging. When using development server please comment out line 20.
The worker will have separate script in worker-entrypoint.sh:
1
2
3
4
5
6
7
8
9
#!/bin/sh

until cd /app/backend
do
    echo "Waiting for server volume..."
done

# run a worker :)
celery -A backend worker --loglevel=info --concurrency 1 -E
The script just start a single worker. You can increase number of workers by changing --concurrency parameter.
Nginx configuration
We will use Nginx server to proxy requests to gunicron (Django) server and to serve static files. We will use default docker image (nging:1.23-alpine). We need to provide configuration file to customize server work. Please create a new directory docker/nginx and add there default.conf file there:
1
2
3
4
5
6
7
8
9
10
11
12
13
14
15
16
17
18
19
20
21
22
23
24
25
26
27
server {
    listen 80;
    server_name _;
    server_tokens off;

    client_max_body_size 20M;

    location / {
        try_files $uri @proxy_api;
    }

    location /admin {
        try_files $uri @proxy_api;
    }

    location @proxy_api {
        proxy_set_header Host $http_host;
        proxy_redirect off;
        proxy_pass   http://server:8000;
    }

    location /django_static/ {
        autoindex on;
        alias /app/backend/django_static/;
    }

}
The server will formard all / and /admin requests to the @proxy_api, which is our gunicorn serving Django. The /django_static/ requests will be served from /app/backend/django_static/ - it is a path where static files will be collected by Django.
Create docker-compose
We have Dockerfile for server and worker ready. The Nginx configuration is waiting for requests. Let’s add a docker-compose.yml to our project:
1
2
3
4
5
6
7
8
9
10
11
12
13
14
15
16
17
18
19
20
21
22
23
24
25
26
27
28
29
30
31
32
33
34
35
36
37
38
39
40
41
42
43
44
45
46
47
48
49
50
51
52
53
54
55
56
57
58
59
60
61
62
63
64
65
66
67
68
69
70
71
72
version: '2'

services:
    nginx:
        restart: always
        image: nginx:1.23-alpine
        ports:
            - 80:80
        volumes:
            - ./docker/nginx/default.conf:/etc/nginx/conf.d/default.conf
            - static_volume:/app/backend/django_static
    server:
        restart: unless-stopped
        build:
            context: .
            dockerfile: ./docker/backend/Dockerfile
        entrypoint: /app/docker/backend/server-entrypoint.sh
        volumes:
            - static_volume:/app/backend/django_static
        expose:
            - 8000
        environment:
            DEBUG: "True"
            CELERY_BROKER_URL: "redis://redis:6379/0"
            CELERY_RESULT_BACKEND: "redis://redis:6379/0"
            DJANGO_DB: postgresql
            POSTGRES_HOST: db
            POSTGRES_NAME: postgres
            POSTGRES_USER: postgres
            POSTGRES_PASSWORD: postgres
            POSTGRES_PORT: 5432
    worker:
        restart: unless-stopped
        build:
            context: .
            dockerfile: ./docker/backend/Dockerfile
        entrypoint: /app/docker/backend/worker-entrypoint.sh
        volumes:
            - static_volume:/app/backend/django_static
        environment:
            DEBUG: "True"
            CELERY_BROKER_URL: "redis://redis:6379/0"
            CELERY_RESULT_BACKEND: "redis://redis:6379/0"
            DJANGO_DB: postgresql
            POSTGRES_HOST: db
            POSTGRES_NAME: postgres
            POSTGRES_USER: postgres
            POSTGRES_PASSWORD: postgres
            POSTGRES_PORT: 5432
        depends_on:
            - server
            - redis
    redis:
        restart: unless-stopped
        image: redis:7.0.5-alpine
        expose:
            - 6379
    db:
        image: postgres:13.0-alpine
        restart: unless-stopped
        volumes:
            - postgres_data:/var/lib/postgresql/data/
        environment:
            POSTGRES_DB: postgres
            POSTGRES_USER: postgres
            POSTGRES_PASSWORD: postgres
        expose:
            - 5432

volumes:
    static_volume: {}
    postgres_data: {}
- lines 4-11 - it is a definition of
nginxcontainer. It is using standardnginx:1.23-alpineimage. We copy configuration file in line 10. We addstatic_volumeat line 11. The samestatic_volumewill be mounted forservercontainer. All static files will go there. There is port80available outside the docker, it can be reached from external world. - lines 12-31 - it is our Django server. It is created using
/docker/backend/Dockerfile(line 16). It hasstatic_volumemounted at line line 19. It exposes port8000- it can be reached only internally indocker-compose. We have envrionment variables set in lines 22-31. The container will executeserver-netrypoint.shscript (line 17). - lines 32-52 - it is a worker container. It doesn’t expose any ports. It depends on
redisandservercontainers (lines 50-52). - lines 53-57 - it is a Redis container. It exposes internally port
6379(can’t be reached from outside ofdocker-compose). - lines 58-68 - it is Postgres database. It exposes internally port
5432. It has environment variables in lines 63-66 to initialize database at start. All database files are stored inpostgres_datavolume. - lines 70-72 - definition of volumes used in the
docker-compose.
We are almost ready to start using the docker-compose. We need to update Django configuration to read envrionment variables. Please edit backend/backend/settings.py file:
# new import
import os

#
# rest of the code ...
#

# set variables
SECRET_KEY = os.environ.get(
    "SECRET_KEY", "django-insecure-6hdy-)5o6k6it_6x%s#u0#guc3(au!=v%%qb674(upu6rrht7b"
)

DEBUG = os.environ.get("DEBUG", True)

ALLOWED_HOSTS = ["127.0.0.1", "0.0.0.0"]

if os.environ.get("ALLOWED_HOSTS") is not None:
    try:
        ALLOWED_HOSTS += os.environ.get("ALLOWED_HOSTS").split(",")
    except Exception as e:
        print("Cant set ALLOWED_HOSTS, using default instead")


#
# rest of the code ...
#

# set database, it can be set to SQLite or Postgres

DB_SQLITE = "sqlite"
DB_POSTGRESQL = "postgresql"

DATABASES_ALL = {
    DB_SQLITE: {
        "ENGINE": "django.db.backends.sqlite3",
        "NAME": BASE_DIR / "db.sqlite3",
    },
    DB_POSTGRESQL: {
        "ENGINE": "django.db.backends.postgresql",
        "HOST": os.environ.get("POSTGRES_HOST", "localhost"),
        "NAME": os.environ.get("POSTGRES_NAME", "postgres"),
        "USER": os.environ.get("POSTGRES_USER", "postgres"),
        "PASSWORD": os.environ.get("POSTGRES_PASSWORD", "postgres"),
        "PORT": int(os.environ.get("POSTGRES_PORT", "5432")),
    },
}

DATABASES = {"default": DATABASES_ALL[os.environ.get("DJANGO_DB", DB_SQLITE)]}

#
# rest of the code ...
#

# set static URL address and path where to store static files
STATIC_URL = "/django_static/"
STATIC_ROOT = BASE_DIR / "django_static"

#
# rest of the code ...
#

# celery broker and result
CELERY_BROKER_URL = os.environ.get("BROKER_URL", "redis://localhost:6379/0")
CELERY_RESULT_BACKEND = os.environ.get("RESULT_BACKEND", "redis://localhost:6379/0")
The project structure at this stage should look like:
├── backend
│   ├── assignments
│   │   ├── admin.py
│   │   ├── apps.py
│   │   ├── __init__.py
│   │   ├── migrations
│   │   │   ├── 0001_initial.py
│   │   │   └── __init__.py
│   │   ├── models.py
│   │   ├── serializers.py
│   │   ├── tasks.py
│   │   ├── tests.py
│   │   ├── urls.py
│   │   └── views.py
│   ├── backend
│   │   ├── asgi.py
│   │   ├── celery.py
│   │   ├── __init__.py
│   │   ├── settings.py
│   │   ├── urls.py
│   │   └── wsgi.py
│   ├── db.sqlite3
│   └── manage.py
├── docker
│   ├── backend
│   │   ├── Dockerfile
│   │   ├── server-entrypoint.sh
│   │   └── worker-entrypoint.sh
│   └── nginx
│       └── default.conf
├── docker-compose.yml
├── LICENSE
├── README.md
└── requirements.txt
docker-compose commands
We are ready to build our docker-compose:
# run in main project directory

sudo docker-compose build
After build you can run all containers with:
sudo docker-compose up
I’m using Ctrl+C to stop containers.
When deploying to the production I’m using:
sudo docker-compose up --build -d
The above one command is building all contaners and running them in detached mode. I can close the SSH connection to the VPS machine and the service will run. The command to stop the docker-compose:
sudo docker-compose down
One more command that is useful. It can be used to login to the running container:
sudo docker exec -it <container_name> bash
The docker-compose is running at 0.0.0.0. Just enter this address in your web broswer to play with your web application.
Summary
We created a simple web application with Django and Celery. We used Postgres database and Redis to have connectivity between Django and Celery. The project was put to docker containers thanks to docker-compose. All code is available at our GitHub repository. Please create GitHub issue there if you have problems or need help. We will try to help you!
You have a lot information from today article. You can start deploying your own application.
If you are looking for more advanced topics (for example, deploying with Let’s encrypt) please subscribe to our newsletter and check our React and Django course on how to build SaaS web application from scratch.
Let's stay in touch!
Would you like to be notified about new posts? Please fill this form.

